
As part of the creating a headless React-based frontend for my WordPress site, I decided to try hosting my files on Netlify. They tout being super fast when serving a non-database site; a natural fit for a React project. Wes Bos’s React for Beginners course shows how to deploy to Netlify using the netlify-cli npm package. However, since completing that course, I updated to Node 10, which is not compatible with netlify-cli and Netlify recently deprecated it. In this post, I’ll detail how to deploy a site from the command line using their new command line tool: netlifyctl.
Sign Up for Netlify
If you don’t already have an account, head over to Netlify.com and sign up for an account. You shouldn’t need to create a paid account yet, so don’t worry about adding payment options.
Install
First off, you’ll need to install the new tool on your computer. On OS X, it’s available through Homebrew and on Windows, it’s available through Scoop.
OS X
If you don’t already have Homebrew installed, open Terminal and enter this command, then follow the prompts:
/usr/bin/ruby -e "$(curl -fsSL https://raw.githubusercontent.com/Homebrew/install/master/install)"
With Homebrew installed, point to the netlifyctl tap:
brew tap netlify/netlifyctl
Next, install it:
brew install netlifyctl
Windows
If you don’t already have Scoop installed, make sure you have PowerShell 3 or higher installed, open it, then install Scoop using:
iex (new-object net.webclient).downloadstring('https://get.scoop.sh')
With Scoop installed, add the netlifyctl bucket:
scoop bucket add netlifyctl https://github.com/netlify/scoop-netlifyctl
Then install it:
scoop install netlifyctl
Deploying a React App
In this case, I’m specifically talking about a project created with create-react-app. If you aren’t using create-react-app, you will need to change some paths to match your project.
With netlifyctl installed, change directories into your project:
cd /myreactapp
Permissions
Start by giving your app permission to access your Netlify account.
netlifyctl login
This will open your Netlify account in a web browser and ask if you want to give the CLI permission to access your account.
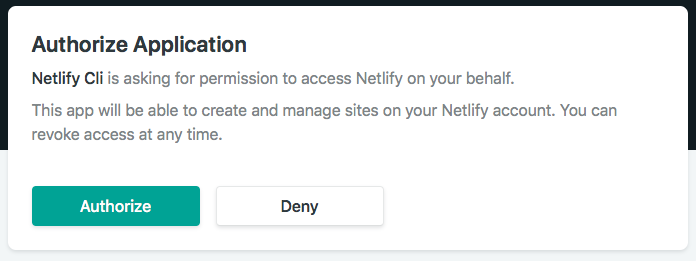
Click the Authorize button. Once it confirms the CLI has permission to access your account, you can close the browser tab/window.
Build
If you haven’t already, run the build process for your app. For create-react-app, that’s:
npm run build
Deploy
Next, use this command to start the deploy process to Netlify:
netlify deploy
It begins by asking if this is a new site. Entering “no” allows you to search by name for the existing site. Entering “yes” creates a new site.
Either way, it then asks for the path you’d like deployed. For a create-react-app project, it is:
./build
This uploads your build directory to Netlify and prompts you with the URL for your deployed app, which you can alt+click to view.
Last Things
That’s it! Your site should be visible on Netlify! A few last things: you’ll notice there’s now a netlify.toml file in your project. This file contains the settings you selected while deploying your app. Commit that file to your git repo to avoid answering those prompt again in the future.
Help!
If you forget how all this works, you can use:
netlifyctl --help
This lists out the commands available and how to use them. You can also use it with a specific command like:
netlifyctl deploy --help
Bonus Material
If you need to make changes to your app - say you’re like me and you forgot to run “npm run build” first so you deployed the default create-react-app build folder - and you need to re-deploy the project. Fortunately, it’s very simple:
netlify deploy
However, each time, the script prompts for the build path. This”feature” grows tiresome when you forget another thing, then another thing, then another thing and perform several deployments in a row (not that I would know from experience…). To avoid this, edit the netlify.toml file and add the build path. The default file includes your Netlify site ID and:
[Build]
  Publish = ""
  Functions = ""
Add your build path in the Publish value between the double quotes:
[Build]
  Publish = "./build"
Now, the deployment script uploads the files from the build folder and doesn’t stop for prompts each time.